while still waiting for my June Queen blocks to arrive I already need to prepare for my request as July Queen (those are goign to be some lovely birhtday presents) I'm so glad I get to be Queen in July.
Yeah I will think of something small and special for my special day.
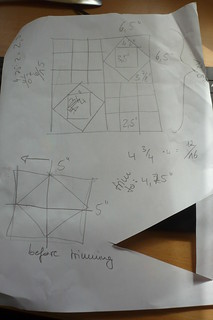
Anyway I saw this lovely block on a blog and decided that's the one I want. So I grabbed the first available paper (yeah I know I could have doen that more professionally). But for those just beginning the block sewing / quilting business I thought it would be interessting to see how you can make up your own block patterns.
And yeah of course in order to tell you how to sew it - and maybe even more importantly to get the pictures I had to do one myself.
And yeah of course in order to tell you how to sew it - and maybe even more importantly to get the pictures I had to do one myself.
I know that the block might look difficult but really it's not - you just need to break it down into its parts and tackle each one individually. I am trying to write less confused than I usually do and actually do a how-to for someone who hasn't done that much sewing yet.

hmm yeah I like scrappy .... but I also like clean lines and order
Fabric you need:
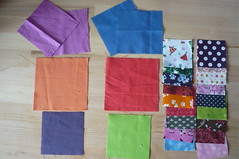
* eighteen (18) - 2,5" squares [prints]
* one (1) - 3,5" square [solid1]
* one (1) - 3,5" square [solid 2]
* one (1) - 4,5" square [solid 3]
* one (1) - 4,5" square [solid 4]
* two (2) - 4" squares [solid 5]
* two (2) - 4" squares [solid 6]
For the 18 little squares use a scrap collection of prints, if you don't have that many different try to get at least 9 together so you can make 2 completely scrappy 9-patches.
Yes it would be lovely if you had enough different solids to make 2 completely diferent square-in-a-square parts, but if you don't please don't use te same fabric in the same position, that will at least give it a different look.
How to sew the square in a square blocks:
First you need to prepare the farbics by cutting some more.
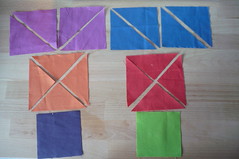
Your 4,5" squares need to be cut twice on the diagonals - so you end up with 2 times 4 triangels.
Your 4" squares need to be cut once each on the diagonal - so you end up with 4 triangels for each colour

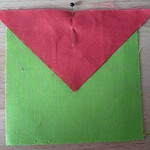
fold the square and the smaller trinagles in half and finger press the middle (give it a good squeeze, or press down on the surface with your nail) - then match the two greases and pin the middle
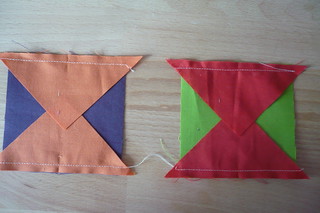
Sew the two opposit triangles to the square then iron them outside (you can in theorie sew them on in radom order but this way it's less ironing time)
Do the same thing with the other two opposite sides. And press open again. 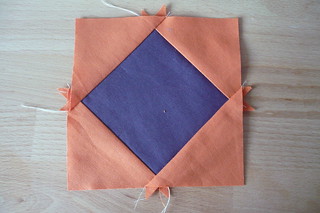
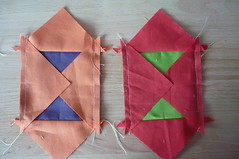
 Untrimmed It should measure 5" depending on how accurate you sewed (min was a bit smaller, but that's why we make it a big on the
Untrimmed It should measure 5" depending on how accurate you sewed (min was a bit smaller, but that's why we make it a big on the
large side)
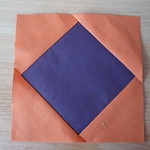
Now this step is really important - you need to trimm down the square to 4 3/4"
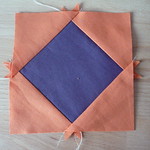
You do the same thing again - this time you use your patch square and add the bigger trinagles in exactly the same way. (fold - finger press - pin - sew 2 - iron ...)
Again we (rather I) chose to be on the larger side - trimm it down to 6,5" square
If you think you are sewing super accurate and really don't want to trim the squares down, the way I liek to do it, because I alway somehow end up on the small side I will refer you to this tutorial.
Sewing the 2 9-patches:
I imagine you don't need me to tell you how to sew a 9-patch together using 2,5" squares?
Just use your favourite technique to sew two (2) scrappy 9-patches.
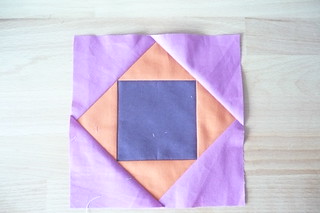
Finishing the block:
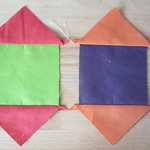
Just look at the picture for the placement of the 4 parts - but in words:
* the square-in-a-square squares go to the top left, respectively the bottom right
*the 9 patches go to the top right and bottom left.
As a final step - measure your block and see if it's 12,5" square if it isn't hmm I'm sure there is an explanation and an individual solution.
Now if you have questions don't hesitate to leave a comment - those turn up in my e-mail and that's is the most realiable way to get hold of me. (Reminds me to turn the sound back on on my cell phone)
Leo
Great instuctions,Leo, and I like that block I might try it with my blue and white block project! I like the scrapy nine patches in there to. cheers. CW
ReplyDeleteI like your block, I always trim mine down too it just takes the angst out of it all!
ReplyDeleteWonderful tutorial and I always trim mine too. Thanks for sharing.
ReplyDeleteFreemotion by the River Linky Party Tuesday
Great block and a fab tutorial. Thx for linking up :o)
ReplyDelete