I think I threw my planned block out the window four of five times and finally settled on this one - Loopy. I
don't claim it as an original idea - as I have doubts there are any out
there in the quilting land anymore, in the end it's geometry and there
are limits to its variations - but I still sat down and did the drafting
and maths and stuff - so for me it's new and exciting and MINE. (If you
happen to stumble across a pattern for it on the web let me know and I
will add a link.)
This is what the block should look like once you are done and it should measure 16,5" x 16,5"
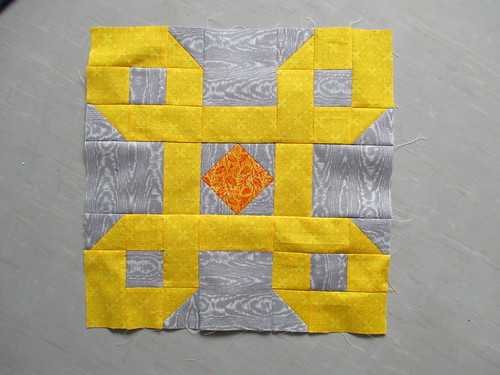
Fabric choice: no novelty prints please, no big flowers either and no solids - think geometry and swirley

What to cut:
ORANGE
(1) - 4,5" x 4,5" --- centre
YELLOW
(8) - 2,5" x 2,5" --- loops
(8) - 2,5" x 4,5" --- loops
(4) - 3" x 3" ------- HSTs for loops
(4) - 2,5" x 4,5" --- connectors
GREY
(8) - 2,5" x 2,5" --- loops
(4) - 3" x 3" ------- HSTs for loops
(4) - 4,5" x 4,5" --- connectors
Let's talk about ironing:

I'm a "sideway" ironer - so there is always the struggle to have the least bulk possible - this is what I came up with for this block. You don't need to follow this to the dot, but I would ask that you try to come out with the centre cross once beeing pressed inside and once outisde so I can comfortably nest the blocks.
Now for the sewing:
1. The centre - it's a simple square in a square block


If you are uncomfortable with that method or just a paper piecing junky - here is the link to the Quilter's Cache instructions and template
2. The loops
They are a basic 6,5" nine-patch blocks made up of 6 colour squares 1 background square and 2 HSTs
HSTs: take the 4 background and 4 colour squares (3"x3") and sew HSTs the traditional way - two in one method - (if you need a detailed instruction sew many ways will help you).


Assembling a loop:

3. The connectors
Join the four 2,5"x4,5" yellow pieces to the four 4,5"x4,5" grey pieces - to form those odd units you see below connectign the loops
Assembling the block:

Leo